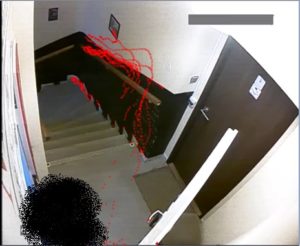
This project deals with analysis of video captures from CCTVs to detect people’s motion and extract their trajectories in time. The output of this project is a relatively short video file containing only frames of the original where the movement was detected along with shown trajectories of people. The second output consists of cumulative image of all trajectories. This can be later used to classify trajectories as (not) suspicious.
Each frame of input video is converted into grayscale and median filtered to remove noise
First 30 seconds of video is used as a learning phase for MOG2 background subtractor
For each next frame the MOG2 mask is calculated and morphological closing is applied to it
If count of non-zero pixels is greater than a set threshold, we claim there is a movement present
Good features to track are found if there is not many left
Optical flow is calculated
Each point which has moved is stored along with frame number
If there is no movement on current frame, postprocess last movement interval (if any)
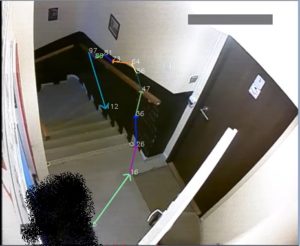
All stored tracking points (x, y, frame number) from previous phase are clusterized by k-means into variable number of centroids
All centroids are sorted by their frame number dimension
Trajectory is drawn onto the output frame
Movement sequence is written into the output video file along with continuously drawn trajectory
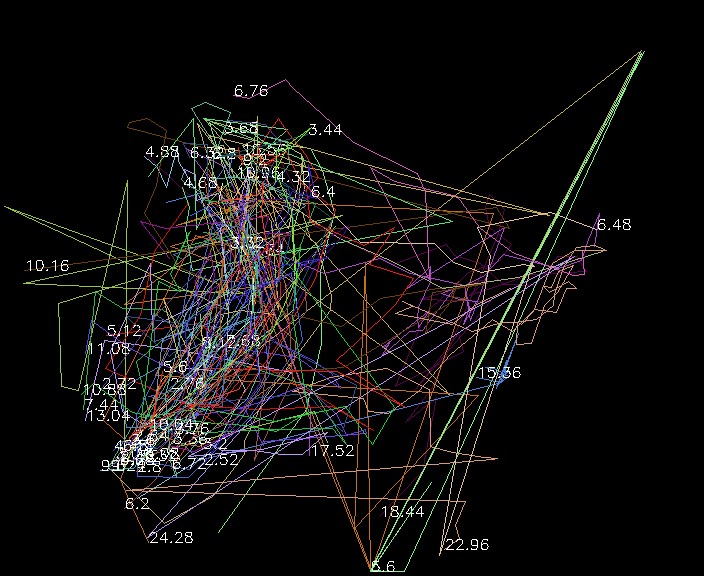
Following image shows the sum of all trajectories found in 2 hours long input video. This can be used to classify trajectories as (not) suspicious.
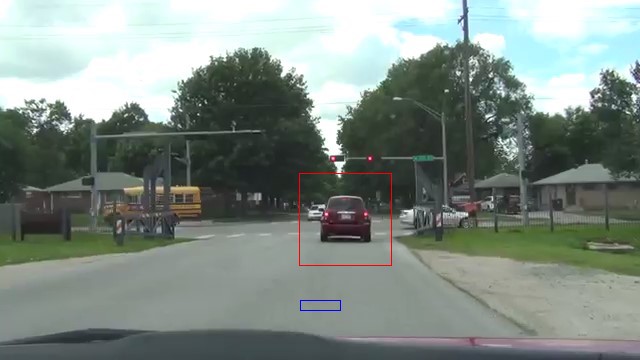
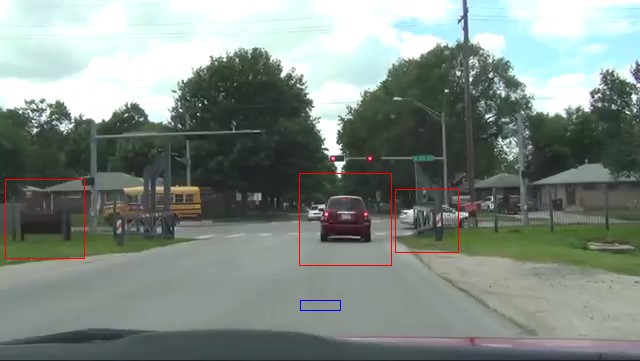
We detect cars from videos recorded by dash cameras situated in cars. This type of camera is dynamic so we decided to train and use Haar Cascade Classifier. The classifier itself returns a lot of false positive results. So we improved classifier by removing false positive results using road detection.
Collect a set of positive samples and negative samples. Make a list file of both (positives.dat and negatives.dat). Then use opencv_createsamples function with parameters to make a single .vec file with all positive samples.
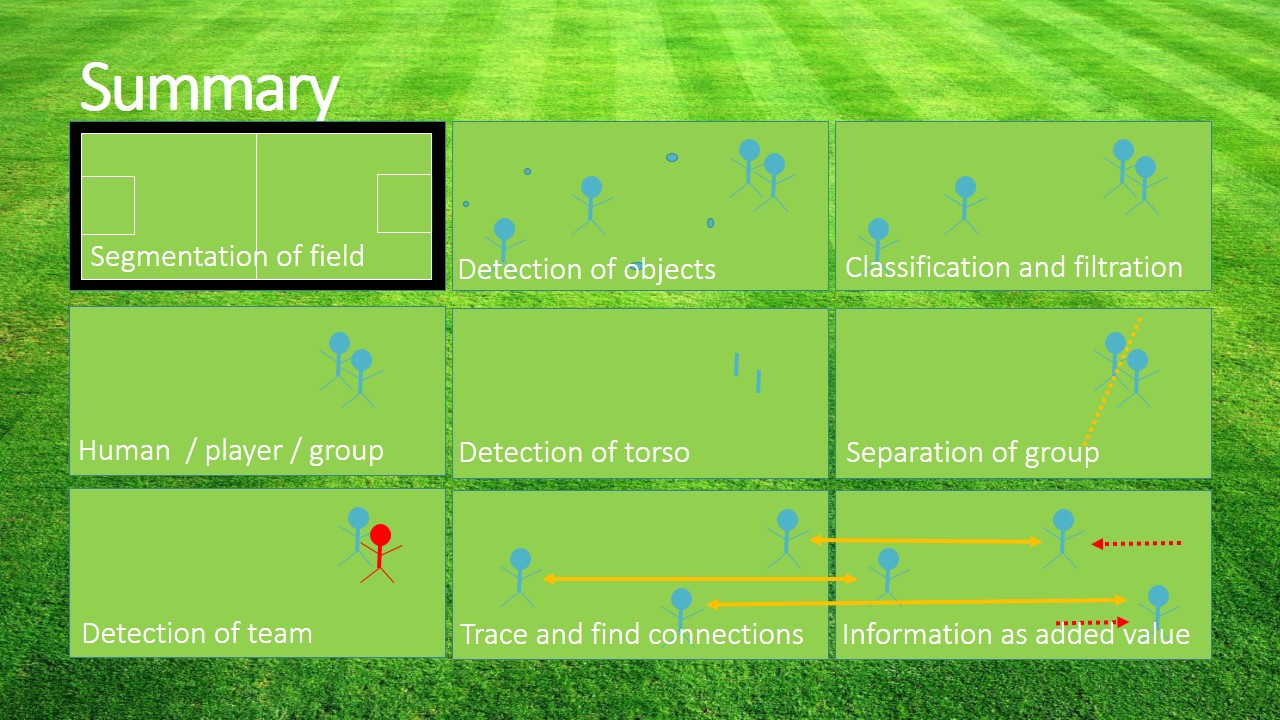
Try detect objects (players, soccer ball, referees, goal keeper) in soccer match. Detect their position, movement and show picked object in ROI area. More info in a presentation and description document.
T. D’Orazio, M.Leo, N. Mosca, P.Spagnolo, P.L.Mazzeo A Semi-Automatic System for Ground Truth Generation of Soccer Video Sequences in the Proceeding of the 6th IEEE International Conference on Advanced Video and Signal Surveillance, Genoa, Italy September 2-4 2009
In our work we focus on basics of motion analysis and object tracking. We compare MeanShift (non-parametric, finds an object on a back projection image) versus CamShift (continuously adaptive mean shift, finds an object center, size, and orientation) algorithms and effectively utilize them to perform simple object tracking. In case these algorithms fail to track the desired object or the object travels out of window scope, we try to find another object to track. To achieve this, we use a background subtractor based on a Gaussian Mixture Background / Foreground Segmentation Algorithm to identify the next possible object to track. There are two suitable implementations of this algorithm in OpenCV – BackgroundSubtractorMOG and BackgroundSubtractorMOG2. We also compare performance of both these implementations.
Used functions:Â calcBackProject, calcHist, CamShift, cvtColor, inRange, meanShift, moments, normalize
Solution
Initialize tracking window:
Set tracking window near frame center
Track object utilizing MeanShift / CamShift
Calculate HSV histogram of region of interest (ROI) and track
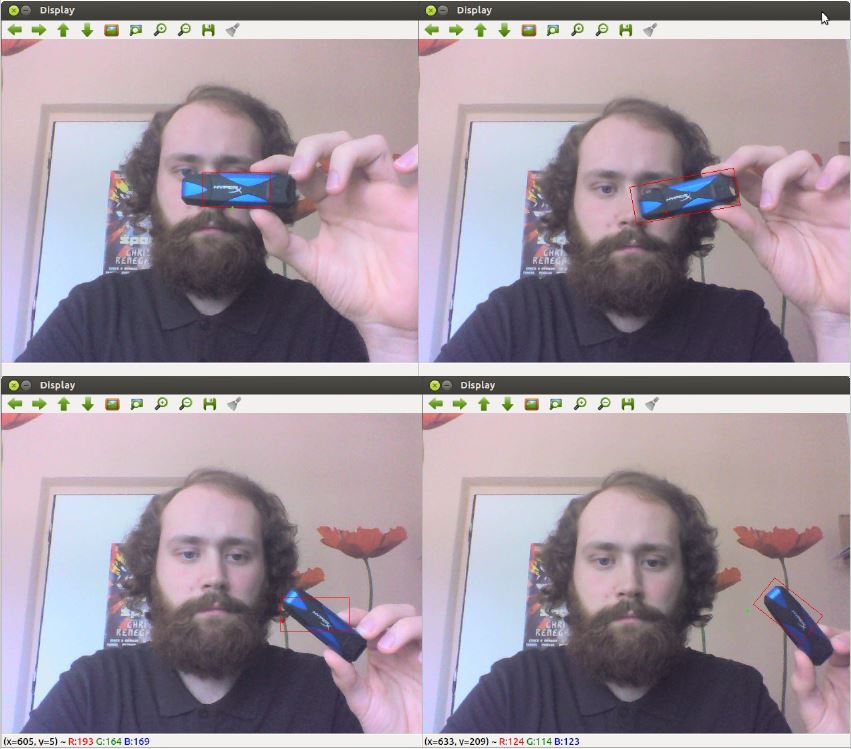
As seen on Fig. 1, MeanShift (left) operates with fixed size tracking windows which can not be rotated. On the contrary, CamShift (right) utilizes the full potential of dynamic size rotated rectangles. Working with CamShift yielded significantly better tracking results in general. On the other hand we recommend to use MeanShift when the object is in constant distance from the camera and moves without rotation (or is represented by a circle), in such case MeanShift performs faster than CamShift and produces sufficient results without any rotation or size change noise.
Fig. 1: MeanShift vs. CamShift.
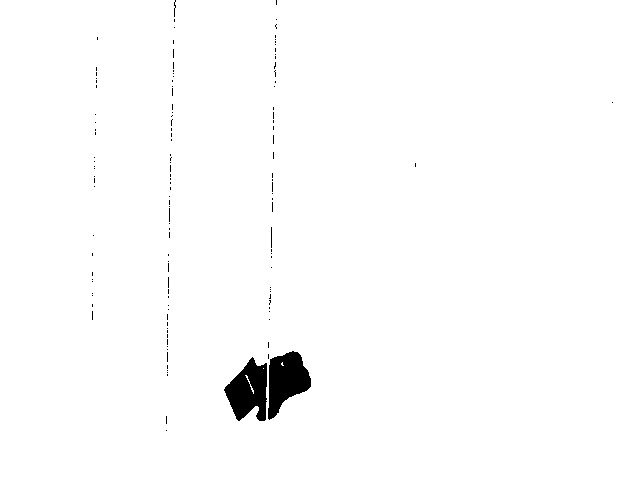
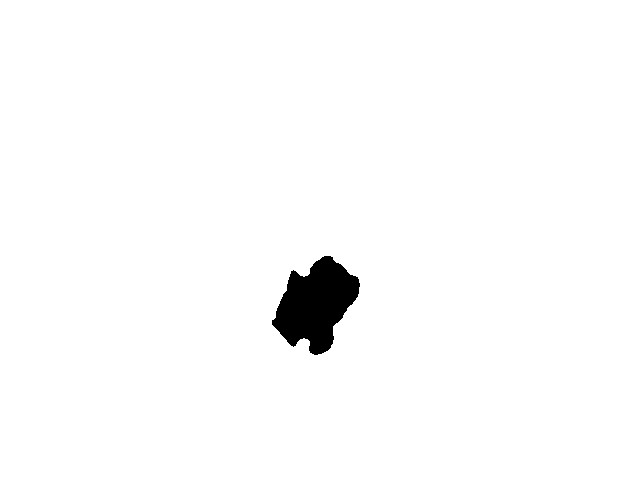
Comparison of BackgroundSubtractorMOG and BackgroundSubtractorMOG2 is depicted on Fig. 2. MOG approach is simpler than MOG2 as it considers only binary masks whereas MOG2 operates on a full gray scale masks. Experiments shown that in our specific case MOG performed better as it yielded less information noise than MOG2. MOG2 will probably produce better results than MOG when utilized more effectively than in out initial approach (simple centeroid from mask extraction).
Fig. 2: MOG vs. MOG2.
Summary
In this project explored the possibilities of simple object tracking via OpenCV APIs utilizing various algorithms such as MeanShift and CamShift, Background Extractor MOG and MOG2, which we also compared. Our solution performs relatively well, but we can certainly improve it by fine tuning histogram calculation, MOG, and other parameters. Other improvements can be done in MOG usage, as now the objects are only recognized by finding MOG mask centeroids. This also calls to better tracking window initialization process.
This example shows how to separate and track moving object using OpenCV. First, the background of the video is being calculated and moving objects detected, then it is filtered and tracked.
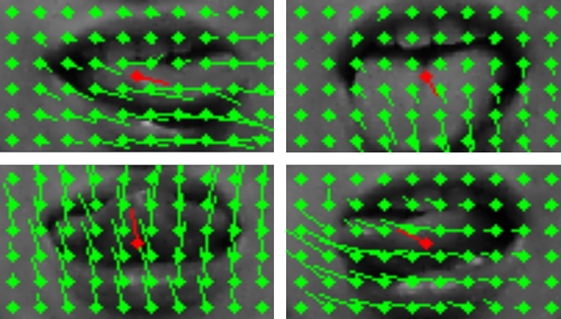
This project is focused on tracking tongue using just the information from plain web camera. Â Majority of approaches tried in this project failed including edge detection, morphological reconstruction and point tracking because of various reasons like homogenous and position-variable character of tongue.
The approach that yields usable results is Farneback method of optical flow. By using this method we are able to detect the direction of movement in image and tongue specifically when we use it on image of sole mouth. However mouth area found by haar cascade classifier is very shaky so the key part is to stabilize it.
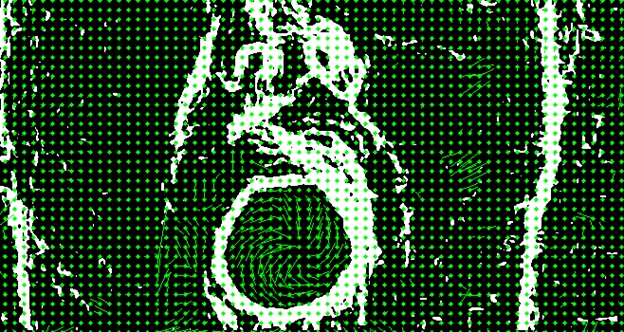
In this project, we aim to recognize the gestures made by the users by moving their lips; Examples: closed mouth, mouth open, mouth wide open, puckered lips. The challenges in this task are the high homogeneity in the observed area, and the rapidity of lip movements. Our first attempts in detecting said gestures are based on the detection of the lip movements through flow with the Farneback method implemented in OpenCV, or alternatively the calculation of the motion gradient from a silhouette image. It appears, that these methods might not be optimal for the solution of this problem.
Detect the position of the largest face in the image using OpenCV cascade classifier. Further steps will be applied using the lower half of the found face.
Add accumulative edge detection frame images on top of each other to obtain the silhouette image. To prevent raised noise in areas without edges, apply a threshold to the Sobel map.
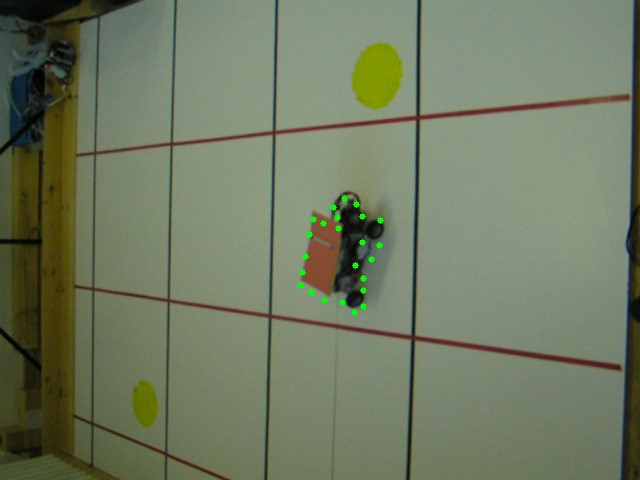
This example shows a new method for tracking significant points in video, representing people or moving objects. This method uses several OpenCV functions.
The process
The opening video file
[c language=”c++”]
VideoCapture MojeVideo („cesta k súboru");
[/c]
Retrieve the next frame (picture)
[c language=”c++”]
Mat FarebnaSnimka;
MojeVideo >> FarebnaSnimka;
[/c]
Converting color images to grayscale image
[c language=”c++”]
Mat Snimka1;
cvtColor(FarebnaSnimka, Snimka1, CV_RGB2GRAY);
[/c]
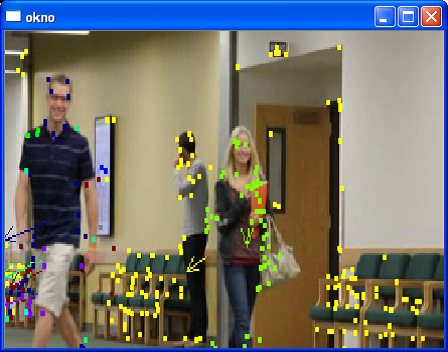
Calculation of the velocity vector for each significant point
Clustering of significant points according to their average velocity vectors
Visualization
Assign a color to cluster
Plotting points on a slide
Plotting arrows at the center points of clusters – average of the average velocity vectors
Dumping the clusters and other places for the classification of points into them (to preserve the color of the cluster) + eventual creation of new clusters
Landmarks declining over time – the time when they need to re-designate
Result
This method is faster than OpenCV method for detecting people.
It also works when only part of person is visible, position is unusual or person is rotated.
Person is divided to parts.
It does not distinguish between persons or other moving objects.
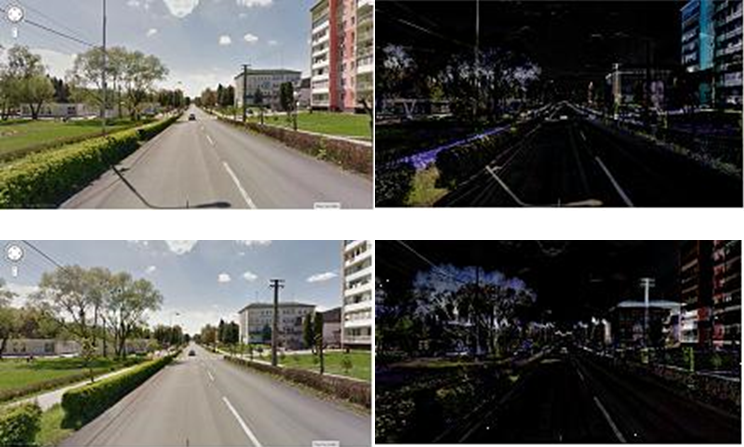
The goal of this project is to create a program that will be able to stitch a sequence of images fromgoogle street-view and make movie from it. The idea came to my mind, when I needed to check thecrossroads and traffic signals along the route I’ve never driven before. The method was tointerpolatefew more images between two consecutive views to simulate moving car. To do that Ihad to do following steps:
Process
Remove UI elements from images
Find homography between following images
Interpolate homography between them
Put images into movie
Removing UI elements from images
Removing UI elements is important because in later steps I will need to find similar areas and those elements can spoil the match-up. First I cycled through all images and gained areas with same color in black. The resulting image was accumulated from all the differences. Black areas represent pixels that were same in all images. To improve the mask I inverted the image did some thresholding, Gaussian blur and again thresholding. Result was mask used for inpaint method to fill in those regions without UI elements with color.
Example of process
Finding homography
Homography found between two images was found using SURF detector. I improved the detection by using mask of similar areas as in previous step. I did it because many key-points were detected on sky or far objects and results were generally worse. Last step was to interpolate from one image to another using homography. In my program I used 25 steps between two pictures. Those pictures were stacked into movie and saved.
[c language=”c++”]
Mat homo = findMatch(pic1, pic2);
bj_corners[0] = cvPoint(0,0)
////– Get the corners from the image_1 ( the object to be "detected" )
vector<Point2f> obj_corners(4);
obj_corners[0] = cvPoint(0,0);
obj_corners[1] = cvPoint( pic2.cols, 0 );
obj_corners[2] = cvPoint( pic2.cols, pic2.rows );
obj_corners[3] = cvPoint( 0, pic2.rows );
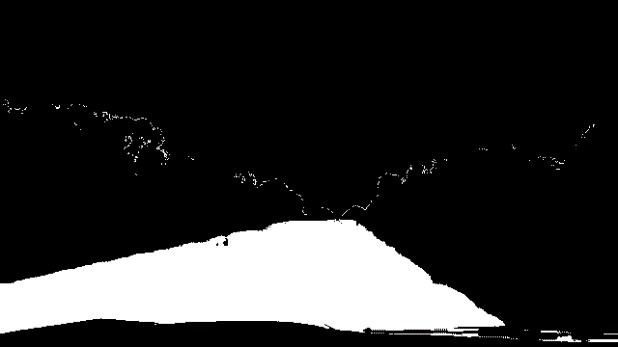
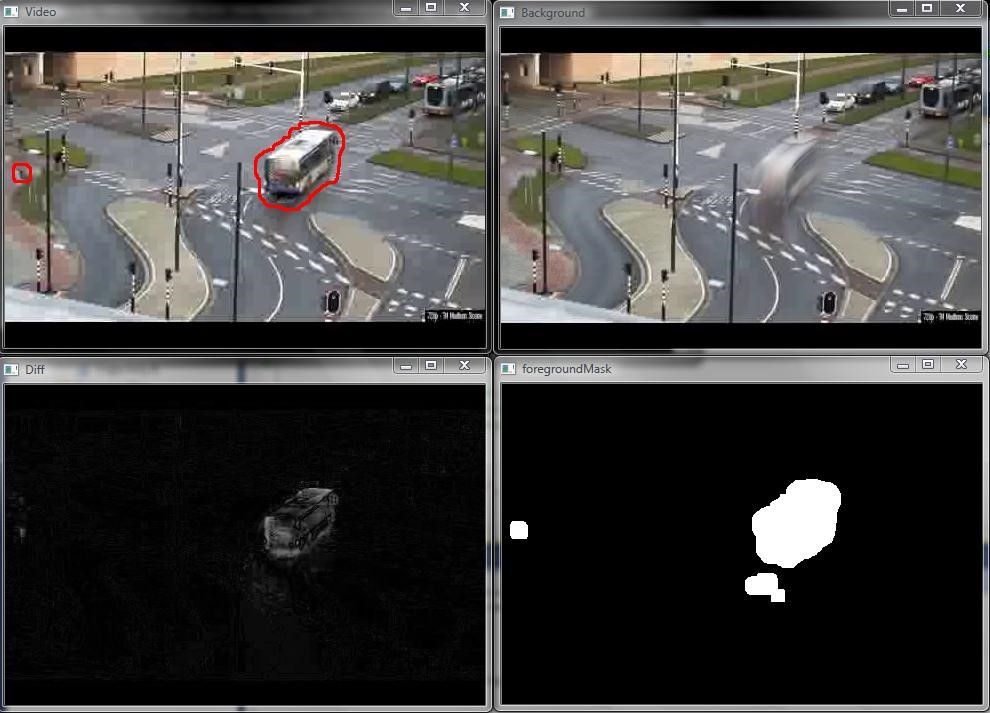
The goal of this project is to implement algorithm that segments foreground using OpenCV library. We assume that background is static, objects in foreground are moving and video is taken from static camera. We detect moving vehicles (foreground) with 2 methods.
Background detection
First method is computing an average image from video frames.
Each frame is added into accumulator with a certain small weight (0.05 and smaller)
accumulateWeighted(frame, background, alpha);
at this point we have in Mat background actual backgorund image
To detect foreground we have to compute difference between current frame and current accumulated background image
absdiff(frame, background, diff);
in Mat diff is color image, we need to transform it into grayscale image
To detect relevant changes (more than given threshold) we use simple
We can use morphological operations (dilatation, erosion) to expand foreground region
Each steps (1-4) are illustrated in next figures. LocalBackgound is the older frame (5 frames old)
Combination of methods
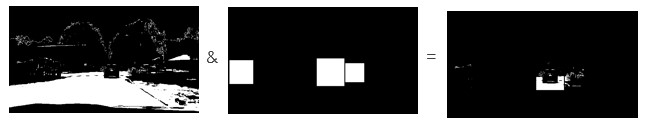
These 2 methods are combined to create more accurate output. In the next picture we can see that first way (computing average image) creates “tails†behind vehicles. Comparing with older frame doesn’t create „tails“.
We use simple sum of binary masks
Mat sumMask = mask1 & mask2
How to create more precise segmentation, future work
To create more precise vehicle segmentation we have to use another methods. Shadows of cars, lights of cars make these 2 methods to hard use. We can only segment region where could be a car, but for more precisely detection we have to use template matching (champfer matching), graph cut method. In this project we experimented with these other two, but these were too complex, so the time complexity was unacceptable to use in video.