Posted on

Face recognition in video using Kinect v2 sensor

Michal Viskup

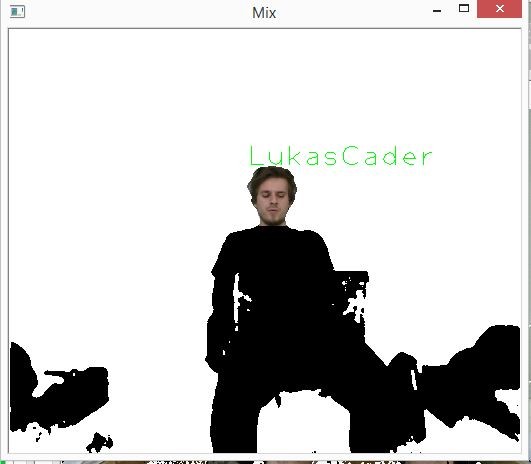
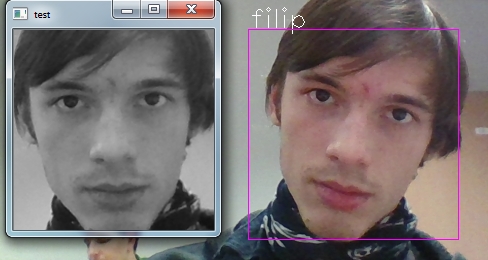
We detect and recognize the human faces in the video stream. Each face in the video is either recognized and the label is drawn next to their facial rectangle or it is labelled as unknown.

The video stream is obtained using Kinect v2 sensor. This sensor offers several data streams, we mention only the 2 relevant for our work:

  • RGB stream (resolution: 1920×1080, depth: 8bits)
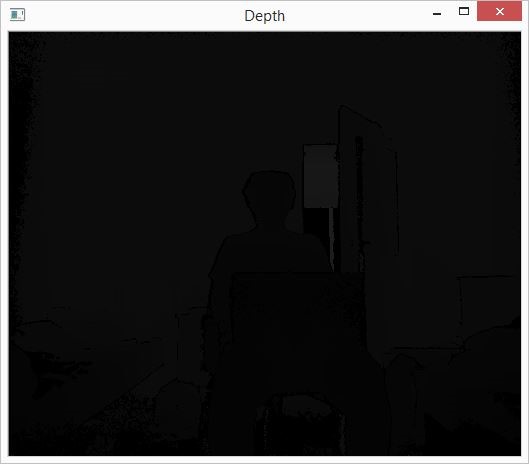
  • Depth stream (resolution: 512×424, depth: 16bits)

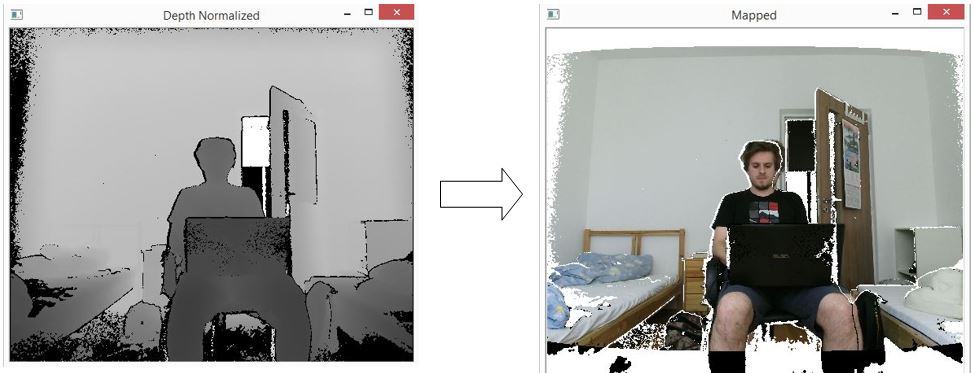
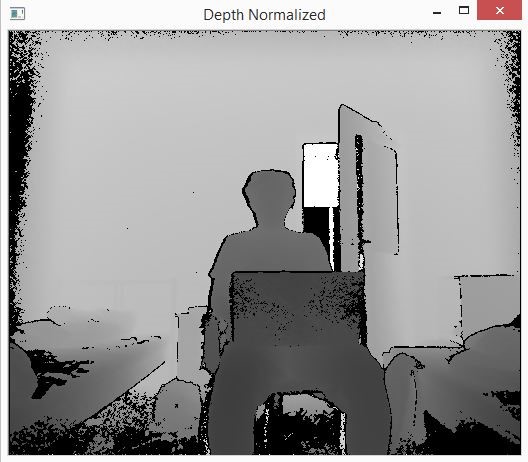
The RGB stream is self-explanatory.  The depth stream consists of the values that denote the distance of the each pixel from the sensor.  The reliable distance lays between the 50 mms and extends to 8 meters. However, past the 4.5m mark, the reliability of the data is questionable. Kinect offers the methods that map the pixels from RGB stream to Depth stream and vice-versa.

We utilize the facial data from RGB stream for the recognition. The depth data is used to enhance the face segmentation through the nose-tip detection.

First of all, the face recognizer has to be trained. The training is done only once. The state of the trained recognizer can be persisted in xml format and reloaded in the future without the need for repeated training. OpenCV offers implementation of three face recognition methods:

  • Eigenfaces
  • Fisherfaces
  • Local Binary Pattern Histograms

We used the Eigenfaces and Fisherfaces method. The code for creation of the face recognizer follows:

void initRecognizer()
{
	Ptr<FaceRecognizer> fr;
	fr = createEigenFaceRecognizer();
	trainRecognizer();
}

It is simple as that. Face recognizer that uses the Fisherfaces method can be created accordingly. The Ptr interface ensures the correct memory management.

All the faces presented to such recognizer would be labelled as unknown. The recognizer is not trained yet. The training requires the two vectors:

  • The vector of facial images in the OpenCV Mat format
  • The vector of integer values containing the identifiers for the facial images

These vectors can be created manually. This however is not sufficient for processing the large training sets. We thus provide the automated way to create these vectors. Data for each subject should be placed in a separate directory. Directories containing the subject data should be places within the single directory (referred to as root directory). The algorithm is given an access to the root directory. It processes all the subject directories and creates both the vector images and the vector labels. We think that the Windows API for accessing the file system is inconvenient. On the other hand, UNIX based systems offer convenient C API through the Dirent interface. Visual Studio compiler lacks the dirent interface. We thus used an external library to gain access to this convenient interface (http://softagalleria.net/dirent.php). Following code requires the library to run:

First we obtain the list of subject names. These stand for the directory names within the root directory. The subject names are stored in the vector of string values. It can be initialized manually or using the text file.

Then, for each subject, the path to their directory is created:

std::ostringstream fullSubjectPath;
fullSubjectPath << ROOT_DIRECTORY_PATH;
fullSubjectPath << "\\";
fullSubjectPath << subjectName;
fullSubjectPath << "\\";

We then obtain the list of file names that reside within the subject directory:

std::vector<std::string> DataProvider::getFileNamesForDirectory(const std::string subjectDirectoryPath)
{
	std::vector<std::string> fileNames;
	DIR *dir;
	struct dirent *ent;
	if ((dir = opendir(subjectDirectoryPath.c_str())) != NULL) {
		while ((ent = readdir(dir)) != NULL) {
			if ((strcmp(ent->d_name, ".") == 0) || (strcmp(ent->d_name, "..") == 0))
			{
				continue;
			}
			fileNames.push_back(ent->d_name);
		}
		closedir(dir);
	}
	else {
		std::cout << "Cannot open the directory: ";
		std::cout << subjectDirectoryPath;
	}
	return fileNames;
}

Then, the images are loaded and stored in vector:

std::vector<std::string> subjectFileNames = getFileNamesForDirectory(fullSubjectPath.str());

std::vector<cv::Mat> subjectImages;
for (std::string fileName : subjectFileNames)
{
	std::ostringstream fullFileNameBuilder;
	fullFileNameBuilder << fullSubjectPath.str();
	fullFileNameBuilder << fileName;
	cv::Mat subjectImage = cv::imread(fullFileNameBuilder.str());
		subjectImages.push_back(subjectImage);
}
return subjectImages;

In the end, label vector is created:

for (int i = 0; i < subjectImages.size(); i++){
	trainingLabels.push_back(label);
}

With images and labels vectors ready, the training is a one-liner:

fr->train(images,labels);

The recognizer is trained. What we need now is a video and depth stream to recognize from.
Kinect sensor is initialized by the following code:

void initKinect()
{
	HRESULT hr;

	hr = GetDefaultKinectSensor(&kinectSensor);
	if (FAILED(hr))
	{
		return;
	}

	if (kinectSensor)
	{
		// Initialize the Kinect and get the readers
		IColorFrameSource* colorFrameSource = NULL;
		IDepthFrameSource* depthFrameSource = NULL;

		hr = kinectSensor->Open();

		if (SUCCEEDED(hr))
		{
			hr = kinectSensor->get_ColorFrameSource(&colorFrameSource);
		}

		if (SUCCEEDED(hr))
		{
			hr = colorFrameSource->OpenReader(&colorFrameReader);
		}

		colorFrameSource->Release();

		if (SUCCEEDED(hr))
		{
			hr = kinectSensor->get_DepthFrameSource(&depthFrameSource);
		}

		if (SUCCEEDED(hr))
		{
			hr = depthFrameSource->OpenReader(&depthFrameReader);
		}

		depthFrameSource->Release();
	}

	if (!kinectSensor || FAILED(hr))
	{
		return;
	}
}

The following function obtains the next color frame from Kinect sensor:

Mat getNextColorFrame()
{
	IColorFrame* nextColorFrame = NULL;
	IFrameDescription* colorFrameDescription = NULL;
	ColorImageFormat colorImageFormat = ColorImageFormat_None;

	HRESULT errorCode = colorFrameReader->AcquireLatestFrame(&nextColorFrame);
	if (!SUCCEEDED(errorCode))
	{
		Mat empty;
		return empty;
	}

	if (SUCCEEDED(errorCode))
	{
		errorCode = nextColorFrame->get_FrameDescription(&colorFrameDescription);
	}
	int matrixWidth = 0;
	if (SUCCEEDED(errorCode))
	{
		errorCode = colorFrameDescription->get_Width(&matrixWidth);
	}
	int matrixHeight = 0;
	if (SUCCEEDED(errorCode))
	{
		errorCode = colorFrameDescription->get_Height(&matrixHeight);
	}
	if (SUCCEEDED(errorCode))
	{
		errorCode = nextColorFrame->get_RawColorImageFormat(&colorImageFormat);
	}
	UINT bufferSize;
	BYTE *buffer = NULL;
	if (SUCCEEDED(errorCode))
	{
		bufferSize = matrixWidth * matrixHeight * 4;
		buffer = new BYTE[bufferSize];
		errorCode = nextColorFrame->CopyConvertedFrameDataToArray(bufferSize, buffer, ColorImageFormat_Bgra);
	}
	Mat frameKinect;
	if (SUCCEEDED(errorCode))
	{
		frameKinect = Mat(matrixHeight, matrixWidth, CV_8UC4, buffer);
	}
	if (colorFrameDescription)
	{
		colorFrameDescription->Release();
	}
	if (nextColorFrame)
	{
		nextColorFrame->Release();
	}

	return frameKinect;
}

Analogous function obtains the next depth frame. The only change is the type and size of the buffer, as the depth frame is single channel 16 bit per pixel.
Finally, we are all set to do the recognition. The face recognition task consists of the following steps:

  1. Detect the faces in video frame
  2. Crop the faces and process them
  3. Predict the identity

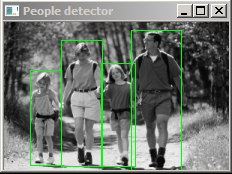
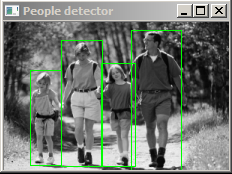
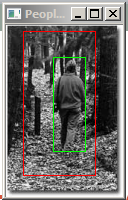
For face detection, we use OpenCV CascadeClassifier. OpenCV provides the extracted features for the classifier for both the frontal and the profile faces. However, in video both the slight and major variations from these positions are present. We thus increase the tolerance for the false positives to prevent the cases when the track of the face is lost between the frames.
The classifier is simply initialized by loading the set of features using its load function.

CascadeClassifier cascadeClassifier;
cascadeClassifier.load(PATH_TO_FEATURES_XML);

The face detection is done as follows:

vector<Mat> getFaces(const Mat frame, vector<Rect_<int>> &rectangles)
{
	Mat grayFrame;
	cvtColor(frame, grayFrame, CV_BGR2GRAY);

	cascadeClassifier.detectMultiScale(grayFrame, rectangles, 1.1, 5);

	vector<Mat> faces;
	for (Rect_<int> face : rectangles){
		Mat detectedFace = grayFrame(face);
		Mat faceResized;
		resize(detectedFace, faceResized, Size(240, 240), 1.0, 1.0, INTER_CUBIC);
		faces.push_back(faceResized);
	}
	return faces;
}

With faces detected, we are set to proceed to recognition. The recognition process is as follows:

Mat colorFrame = getNextColorFrame();
vector<Rect_<int>> rectangles;
vector<Mat> faces = getFaces(colorFrameResized, rectangles);
int label = -1;
label = fr->predict(face);
string box_text = format("Prediction = %d", label);
putText(originalFrame, box_text, Point(rectangles[i].tl().x, rectangles[i].tl().y), FONT_HERSHEY_PLAIN, 1.0, CV_RGB(0, 255, 0), 2.0);

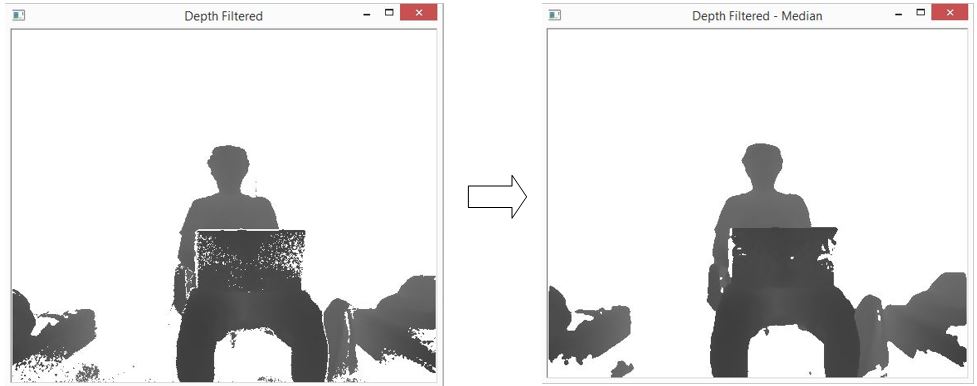
Nose tip detection is done as follows:

unsigned short minReliableDistance;
unsigned short maxReliableDistance;
Mat depthFrame = getNextDepthFrame(&minReliableDistance, &maxReliableDistance);
double scale = 255.0 / (maxReliableDistance - minReliableDistance);
depthFrame.convertTo(depthFrame, CV_16UC1, scale);

// detect nose tip
// only search for the nose tip in the head area
Mat deptHeadRegion = depthFrame(rectangles[i]);
			
// Nose is probably the local minima in the head area
double min, max;
Point minLoc, maxLoc;
minMaxLoc(deptHeadRegion, &min, &max, &minLoc, &maxLoc);
	minLoc.x += rectangles[i].x;
	minLoc.y += rectangles[i].y;

// Draw the circle at proposed nose position.
circle(depthFrame, minLoc, 5, 255, -1);

To conclude, we provide a simple implementation that allows the detection and recognition of human faces within a video. The room for improvement is that rather than allowing more false positives in detection phase, the detected nose tip can be used for face tracking.

Posted on

Face recognition using depth data from Kinect sensor

Lukas Cader

We will segment face from color camera with use of depth data and run recognition on it using OpenCV functions: EigenFaces, FisherFaces and LBPH.

Complete process is as follows:

  1. First we need to obtain RGB and depth stream from Kinect sensor and copy it to byte array in order to be usable for OpenCV
    IColorFrame* colorFrame = nullptr;
    IDepthFrame* depthFrame = nullptr;
    ushort* _depthData = new ushort[depthWidth * depthHeight];
    byte* _colorData = new byte[colorWidth * colorHeight * BYTES_PER_PIXEL];
    	
    m_pColorFrameReader->AcquireLatestFrame(&colorFrame);
    m_pDepthFrameReader->AcquireLatestFrame(&depthFrame);
    colorFrame->CopyConvertedFrameDataToArray(colorWidth * colorHeight * BYTES_PER_PIXEL, _colorData, ColorImageFormat_Bgra);
    depthFrame->CopyFrameDataToArray(depthWidth * depthHeight, _depthData);
    
    
  2. Because color and depth camera have different resolutions we need to map coordinates from color image to depth image. (We will use Kinect’s Coordinate Mapper)
    m_pCoordinateMapper->MapDepthFrameToColorSpace(depthWidth * depthHeight,(UINT16*) _depthData, depthWidth * depthHeight, _colorPoints);
    

    cader_kinect_mapping

  3. Because we are going to segment face from depth data we need to process them as is shown in the next steps:
    1. Unmodified depth data shown in 2D
      cader_depth
    2. Normalization of values to 0-255 range
      – Better representation

      cv::Mat img0 = cv::Mat::zeros(depthHeight, depthWidth, CV_8UC1);
      double scale = 255.0 / (maxDist - minDist);
      depthMap.convertTo(img0, CV_8UC1, scale);
      

      cader_normalized_depth

    3. Removal of the nearest points and bad artifacts
      – the points for which Kinect can’t determine depth value are by default set to 0 – we will set them to 255

      if (val < MinDepth)
      {
      	image.data[image.step[0] * i + image.step[1] * j + 0] = 255;
      }


      cader_cleaned_depth

    4. Next we want to segment person, we apply depth threshold to filter only nearest points and the ones within certain distance from them and apply median blur to image to remove unwanted artifacts such as isolated points and make edges of segmented person less sharp.
      cader_filtered_depth

      if (val > (__dpMax+DepthThreshold))
      {
      	image.data[image.step[0] * i + image.step[1] * j + 0] = 255;
      }
      
  4. Now when we have processed depth data we need to segment face. We find the highest non-white point in depth map and mark it as the top of head. Next we make square segmentation upon depth mask with dynamic size (distance from user to sensor is taken into account) from top of the head and in this segmented part we find the leftmost and rightmost point and made second segmentation. The 2 new points and point representing top of the head will now be the border points of the new segmented region. (Sometimes because of dynamic size of square we have also parts of shoulders in our first segmentation, in order to mitigate this negative effect we are looking for leftmost and rightmost point only in the upper half of the image)
    if (val == 255 || i > (highPointX + headLength) || (j < (highPointY - headLength / 2) && setFlag) || (j > (highPointY + headLength / 2) && setFlag))
    {
    //We get here if point is not in face segmentation region
    	...
    }
    else if (!setFlag) 
    {
    //We get here if we find the first non-white (highest) point in image and set segmentation region
    highPointX = i;
    highPointY = j;
    headLength = 185 - 1.2*(val); //size of segmentation region
    setFlag = true;
    ...			
    }
    else
    {
    //We get here if point is in face segmentation region and we want to find the leftmost and the rightmost point
    
    if (j < __leftMost && i < (__faceX + headLength/2)) __leftMost = j;
    if (j > __rightMost && i < (__faceX + headLength/2)) __rightMost = j;
    }
    
    
  5. When face is segmented we can use one of OpenCV functions for face recognition and show result to the user.
    cader_result
Posted on

Pedestrian detection

This project focuses on preprocessing of training images for pedestrian detection. The goal is to train a model of a pedestrian detection. Histogram of oriented gradients HOG has been used as descriptor of image features. Support vector machine SVM has been used to train the model.

Example:

valko1
Input image

There are several ways to cut train example from source:

  1. using simple bounding rectangle
  2. adding “padding” around simple bounding rectangle
  3. preserve given aspect ratio
  4. using only upper half of pedestrian body

At first, the simple bounding rectangle around pedestrian has been determined. Annotation of training dataset can be used if it is available. In this case a segmentation annotation in form of image mask has been used. Bounding box has been created from image mask using contours (if multiple contours for pedestrian has been found, they were merged to one).);

findContours(mask, contours, CV_RETR_TREE, CV_CHAIN_APPROX_SIMPLE);
boundRect[k] = boundingRect(Mat(contours[k]));

HOG descriptors has been computed using OpenCV function hog.compute(), where descriptor parameters has been set like this:

Size win_size = Size(64, 128); 
HOGDescriptor hog = HOGDescriptor(win_size, Size(16, 16), Size(8, 8), Size(8, 8), 9);

Window width = 64 px, window height = 128 px, block size = 16×16 px, block stride = 8×8 px, cell size = 8×8 px and number of orientation bins = 9.

Each input image has been re-scaled to fit the window size.

1.) Image, which had been cut using simple bounding rectangle, has been resized to fit aspect ratio of descriptor window.

valko2 valko3

2.) In the next approach the simple bounding rectangle has been enlarged to enrich descriptor vector with background information. Padding of fixed size has been added to each side of image. When the new rectangle exceeded the borders of source image, the source image has been enlarged by replication of marginal rows and columns.
valko4

if (params.add_padding)
// Apply padding around patches, handle borders of image by replication
{
	l -= horizontal_padding_size;
	if (l < 0)
	{
		int addition_size = -l;
		copyMakeBorder(timg, timg, 0, 0, addition_size, 0, BORDER_REPLICATE);
		l = 0;
		r += addition_size;
	}
	t -= vertical_padding_size;
	if (t < 0)
	{
		int addition_size = -t;
		copyMakeBorder(timg, timg, addition_size, 0, 0, 0, BORDER_REPLICATE);
		t = 0;
		b += addition_size;
	}
	r += horizontal_padding_size;
	if (r > = timg.size().width)
	{
		int addition_size = r - timg.size().width + 1;
		copyMakeBorder(timg, timg, 0, 0, 0, addition_size, BORDER_REPLICATE);
	}
	b += vertical_padding_size;
	if (b > = timg.size().height)
	{
		int addition_size = b - timg.size().height + 1;
		copyMakeBorder(timg, timg, 0, addition_size, 0, 0, BORDER_REPLICATE);
	}
	allBoundBoxesPadding[i] = Rect(Point(l, t), Point(r, b));
}

3. In the next approach the aspect ratio of descriptor window has been preserved while creating the cutting bounding rectangle (so pedestrian were not deformed). In this case the only necessary padding has been added.

4. In the last approach only the half of pedestrian body has been used.

valko5

int hb = t + ((b - t) / 2);
allBoundBoxes[i] = Rect(Point(l, t), Point(r, hb));

valko6

NG rng(12345);
static const int MAX_TRIES = 10;
int examples = 0;
int tries = 0;
int rightBoundary = img.size().width - params.neg_example_width / 2;
int leftBoundary = params.neg_example_width / 2;
int topBoundary = params.neg_example_height / 2;
int bottomBoundary = img.size().height - params.neg_example_height / 2;
while (examples < params.negatives_per_image && tries < MAX_TRIES)
{
	int x = rng.uniform(leftBoundary, rightBoundary);
	int y = rng.uniform(topBoundary, bottomBoundary);
	bool inBoundingBoxes = false;
	for (std::vector::iterator it = allBoundBoxes.begin();
		it != allBoundBoxes.end();
		it++)
	{
		if (it->contains(Point(x, y)))
		{
			inBoundingBoxes = true;
			break;
		}
	}
	if (inBoundingBoxes == false) {
		Rect rct = Rect(Point((x - params.neg_example_width / 2), (y - params.neg_example_height / 2)), Point((x + params.neg_example_width / 2), (y + params.neg_example_height / 2)));
		boost::filesystem::path file_neg = (params.negatives_target_dir_path / img_path.stem()).string() + "_" + std::to_string(examples) + img_path.extension().string();
		imwrite(file_neg.string(), img(rct));
		examples++;
	}
	tries++;
}

SVM model has been learned using Matlab function fitcsvm(). The single descriptor vector has been computed:

ay = SVMmodel.Alpha .* SVMmodel.SupportVectorLabels;
sv = transpose(SVMmodel.SupportVectors);
single = sv*ay;
% Append bias
single = vertcat(single, SVMmodel.Bias);
% Save vector to file
dlmwrite(model_file, single,'delimiter','\n');

Single descriptor vector has been loaded and set
( hog.setSVMDetector(descriptor_vector) ) in detection algorithm which used the OpenCV function hog.detectMultiScale() to detect occurrences on multiple scale within whole image.

HOG visualization
As a part of project, the HOG descriptor visualization has been implemented. See algorithm bellow. Orientations and magnitudes of gradients are visualized by lines at each position (cell). In first part of algorithm all values from normalization over neighbor blocks at given position has been merged together. Descriptor vector of size 9×4 for one position has yielded vector of size 9.

valko7

void visualize_HOG(std::string file_path, cv::Size win_size = cv::Size(64, 128), int
	visualization_scale = 4)
{
	using namespace cv;
	Mat img = imread(file_path, CV_LOAD_IMAGE_GRAYSCALE);
	// resize image (size must be multiple of block size)
	resize(img, img, win_size);
	HOGDescriptor hog(win_size, Size(16, 16), Size(8, 8), Size(8, 8), 9);
	vector descriptors;
	hog.compute(img, descriptors, Size(0, 0), Size(0, 0));
	size_t cell_cols = hog.winSize.width / hog.cellSize.width;
	size_t cell_rows = hog.winSize.height / hog.cellSize.height;
	size_t bins = hog.nbins;
	// block has size: 2*2 cell
	size_t block_rows = cell_rows - 1;
	size_t block_cols = cell_cols - 1;
	size_t block_cell_cols = hog.blockSize.width / hog.cellSize.width;
	size_t block_cell_rows = hog.blockSize.height / hog.cellSize.height;
	size_t binspercellcol = block_cell_rows * bins;
	size_t binsperblock = block_cell_cols * binspercellcol;
	size_t binsperblockcol = block_rows * binsperblock;
	struct DescriptorSum
	{
		vector bin_values;
		int components = 0;
		DescriptorSum(int bins)
		{
			bin_values = vector(bins, 0.0f);
		}
	};
	vector average_descriptors = vector(cell_cols, vector(cell_rows, DescriptorSum(bins)));
	// iterate over block columns
	for (size_t col = 0; col < block_cols; col++)
	{
		// iterate over block rows
		for (size_t row = 0; row < block_rows; row++)
		{
			// iterate over cell columns of block
			for (size_t cell_col = 0; cell_col < block_cell_cols; cell_col++)
			{
				// iterate over cell rows of block
				for (size_t cell_row = 0; cell_row < block_cell_rows; cell_row++)
				{
					// iterate over bins of cell
					for (size_t bin = 0; bin < bins; bin++)
					{
						average_descriptors[col + cell_col][row + cell_row].bin_values[bin] += descriptors[(col*binsperblockcol) + (row*binsperblock) + (cell_col*binspercellcol) + (cell_row*bins) + (bin)];
					}
					average_descriptors[col + cell_col][row + cell_row].components++;
				}
			}
		}
	}
	resize(img, img, Size(hog.winSize.width * visualization_scale, hog.winSize.height * visualization_scale));
	cvtColor(img, img, CV_GRAY2RGB);
	Scalar drawing_color(0, 0, 255);
	float line_scale = 2.f;
	int cell_half_width = hog.cellSize.width / 2;
	int cell_half_height = hog.cellSize.height / 2;
	double rad_per_bin = M_PI / bins;
	double rad_per_halfbin = rad_per_bin / 2;
	int max_line_length = hog.cellSize.width;
	// iterate over columns
	for (size_t col = 0; col < cell_cols; col++)
	{
		// iterate over cells in column
		for (size_t row = 0; row < cell_rows; row++)
		{
			// iterate over orientation bins
			for (size_t bin = 0; bin < bins; bin++)
			{
				float actual_bin_strength = average_descriptors[col][row].bin_values[bin] / average_descriptors[col][row].components;
				// draw lines
				if (actual_bin_strength == 0)
					continue;
				int length = static_cast(actual_bin_strength * max_line_length * visualization_scale * line_scale);
				double angle = bin * rad_per_bin + rad_per_halfbin + (M_PI / 2.f);
				double yrange = sin(angle) * length;
				double xrange = cos(angle) * length;
				Point cell_center;
				cell_center.x = (col * hog.cellSize.width + cell_half_width) * visualization_scale;
				cell_center.y = (row * hog.cellSize.height + cell_half_height) * visualization_scale;
				Point start;
				start.x = cell_center.x + static_cast(xrange / 2);
				start.y = cell_center.y + static_cast(yrange / 2);
				Point end;
				end.x = cell_center.x - static_cast(xrange / 2);
				end.y = cell_center.y - static_cast(yrange / 2);
				line(img, start, end, drawing_color);
			}
		}
	}
	char* window = "HOG visualization";
	cv::namedWindow(window, CV_WINDOW_AUTOSIZE);
	cv::imshow(window, img);
	while (true)
	{
		int c;
		c = waitKey(20);
		if ((char)c == 32)
		{
			break;
		}
	}
}
Posted on

Detection of objects in soccer

Lukas Sekerak

Project idea

Try detect objects (players, soccer ball, referees, goal keeper) in soccer match. Detect their position, movement and show picked object in ROI area. More info in a presentation and description document.

Requirements

  • Opencv 2.4
  • log4cpp

Dataset videos

Operation Agreement CNR-FIGC

T. D’Orazio, M.Leo, N. Mosca, P.Spagnolo, P.L.Mazzeo A Semi-Automatic System for Ground Truth Generation of Soccer Video Sequences in the Proceeding of the 6th IEEE International Conference on Advanced Video and Signal Surveillance, Genoa, Italy September 2-4 2009

Setup

  1. Clone this repository into workspace
  2. Download external requirements + dataset
  3. Build project
  4. Run project

Control keys

  • W – turn on/off ROI area
  • Q,E – switch between detected ROI
  • S – pause of processing frames
  • F – turn on/off debug draw

License

This software is released under the MIT License.

Credits

  • Ing. Wanda BeneÅ¡ová, PhD. – Supervisor

2


Project repository: https://github.com/sekys/sk.seky.soccerball

Posted on

People detection

Martin Petlus

The goal of this project is detection of people on images. Persons on images are:

  • standing
  • person can be rotated from the front, back and from the side
  • different sizes of persons
  • can be in move
  • several persons on single image

petlus_detector1

For our project the main challenge was the highest possible precision of detection, detection of all persons on image in all possible situations. Persons can also be interleaved.

In our project we have experimented with two different approaches. Both are based on SVM classifier. This classifier takes images as input and detects persons on image. HOG descriptor is used by classifier to extract features from images in classification process. Sliding window is used to detect persons of different sizes. We have experimented with two different classifiers on two different datasets (D1 and D2).

  • Trained classifier from OpenCV
    • Precision:
      • D1: 51.5038%, 3 false positives
      • D2: 56.3511%, 49 false positives
  • Our trained classifier
    • Precision
      • D1: 66.9556%, 87 false positives
      • D2: 40.4521%, 61 false positives

Result of people detection:

patlus_detector2

We see possible improvments in extracting other features from images, or in using bigger datasets.

void App::trainSVM()
{
	CvSVMParams params;
	/*params.svm_type = CvSVM::C_SVC;
	params.kernel_type = CvSVM::LINEAR;
	params.term_crit = cvTermCriteria(CV_TERMCRIT_ITER, 100, 1e-6);*/
	params.svm_type = SVM::C_SVC;
	params.C = 0.1;
	params.kernel_type = SVM::LINEAR;
	params.term_crit = TermCriteria(CV_TERMCRIT_ITER, (int)1e7, 1e-6);
	int rows = features.size();
	int cols = number_of_features();
	Mat featuresMat(rows, cols, CV_32FC1);
	Mat labelsMat(rows, 1, CV_32FC1);
	for (unsigned i = 0; i<rows; i++)
	{
		for (unsigned j = 0; j<cols; j++)
		{
			featuresMat.at<float>(i, j) = features.at(i).at(j);
		}
	}
	for (unsigned i = 0; i<rows; i++)
	{
		labelsMat.at<float>(i, 0) = labels.at(i);
	}
	SVM.train(featuresMat, labelsMat, Mat(), Mat(), params);
	SVM.getSupportVector(trainedDetector);
	hog.setSVMDetector(trainedDetector);
}
Posted on

Face recognition improved by face aligning

Face recognition improved by face aligning
TEXT:
Face recognition consists of these steps:

  1. Create training set for face recognition
  2. Load training set for face recognition
  3. Train faces and create model
  4. Capture/load image where you want to recognize people
  5. Find face/s
  6. Adjust the image for face recognition (greyscale, crop, resize, rotate …)
  7. Use trained model for face recognition
  8. Display result

Creating training set

To recognize faces you first need to train faces and create model for each person you want to be recognized. You can do this by manually cropping faces and adjusting them, or you can just save adjusted face from step 6 with name of the person. It is simple as that. I store this information in the name of file, which may not be the best option so there is room for improvement here.


string result;
unsigned long int sec = time(NULL);
result << “facedata/” << user << “_” << sec << “.jpg”;

imwrite(result, croppedImage); capture = false;

As you can see I add timestamp to the name of the image so they have different names. And string user is read from console just like this:


user.clear(); cin >> user;

Loading training set

Working with directories in windows is a bit tricky because String is not suitable since directories and files can contain different diacritics and locales. Working with windows directories in c++ requires the use of WString for file and directories names.


vector get_all_files_names_within_folder(wstring folder)
{
vector names;
TCHAR search_path[200];
StringCchCopy(search_path, MAX_PATH, folder.c_str());
StringCchCat(search_path, MAX_PATH, TEXT(“\\*”));
WIN32_FIND_DATA fd;
HANDLE hFind = ::FindFirstFile(search_path, &fd);
if (hFind != INVALID_HANDLE_VALUE)
{
do
{
if (!(fd.dwFileAttributes & FILE_ATTRIBUTE_DIRECTORY))
{
wstring test = fd.cFileName;
string str(test.begin(), test.end());
names.push_back(str);
}
} while (::FindNextFile(hFind, &fd));
::FindClose(hFind);
}
return names;
}
void getTrainData(){
wstring folder(L”facedata/”);
vector files = get_all_files_names_within_folder(folder);
string fold = “facedata/”;
int i = 0;
for (std::vector::iterator it = files.begin(); it != files.end(); ++it) {
images.push_back(imread(fold + *it, 0));
labelints.push_back(i);
string str = *it;
unsigned pos = str.find(“_”);
string str2 = str.substr(0, pos);
labels.push_back(str2);
i++;
}
}

I create 3 sets for face recognition and mapping. variable labelints is used in face recognition model, then its value serves as index for finding proper string representation of person and his training image.

Train faces and create model

Face recognition in opencv has three available implementations: Eiegenfaces, Fisherfaces and Local Binary Patterns Histograms. In this stage you choose which one you want to use. I found out that LBPH has the best results but is really slow. You can find out more about which one to choose in opencv’s face recognition tutorial.


void learnFacesEigen(){

model = createEigenFaceRecognizer();
model->train(images, labelints);
}
void learnFacesFisher(){
model = createFisherFaceRecognizer();
model->train(images, labelints);
}
void learnFacesLBPH(){
model = createLBPHFaceRecognizer();
model->train(images, labelints);
}

Capture/load image where you want to recognize people

You can load image from file as was showed before on training set or you can capture frames from your webcam. Some webcams are a bit slow and you might end up adding some sleep between initialising the camera and capturing frames. If you don’t get any frames try increasing the sleep or change the stream number.


VideoCapture stream1(1);
//– 2. Read the video stream
if (!stream1.isOpened()){
cout << “cannot open camera”;
}
Sleep(2000);
while (true)
{
bool test = stream1.read(frame);
if (test)
{
detectAndDisplay(frame, capture, user, recognize);
}
else
{
printf(” –(!) No captured frame — Break!”); break;
}

}

stream1.release();

You can play with number in stream1(number) to choose the webcam you need or pick -1 to open a window with webcam selection and 0 is default.

Find face/s

Facedetection in opencv is usually done by using haar cascades. You can learn more about it in opencv’s Cascade Classifier post
Code is explained there so I will skip this part.

Adjust the image for face recognition

The most interesting part and the part where there is still much to do is this one. Face recognition in OpenCV works only on images with same size and greyscale. The more aligned faces are the better face recognition results are. So we need to convert the image to greyscale.


cvtColor(frame, frame_gray, CV_BGR2GRAY);

Then rotate face to vertical position so it is aligned perfectly. I do this by computing height difference between the eyes and when eyes are shut I use histogram of oriented gradients for nose to get its orientation. First thing first we need to find eyes on picture. I cropped the image to just the face part so the classifier has easier job finding eyes and doesn’t throw false positives.


int tlY = faces[i].y;
if (tlY < 0){ tlY = 0; } int drY = faces[i].y + faces[i].height; if (drY>frame.rows)
{
drY = frame.rows;
}
Point tl(faces[i].x, tlY);
Point dr(faces[i].x + faces[i].width, drY);

Rect myROI(tl, dr);
Mat croppedImage_original = frame(myROI);

I tried different crops. But the best one seems to be the one with dropped out chin and a little bit of forehead which is defaultly recognized by OpenCV’s face haar classifier. Then I use different classifier to find the eyes and I decide from x position which one is left, which one is right.


eye_cascade.detectMultiScale(croppedImageGray, eyes, 1.1, 3, CV_HAAR_DO_CANNY_PRUNING, Size(croppedImageGray.size().width*0.2, croppedImageGray.size().height*0.2));

int eyeLeftX = 0;
int eyeLeftY = 0;
int eyeRightX = 0;
int eyeRightY = 0;
for (size_t f = 0; f < eyes.size(); f++)
{
int tlY2 = eyes[f].y + faces[i].y;
if (tlY2 < 0){ tlY2 = 0; } int drY2 = eyes[f].y + eyes[f].height + faces[i].y; if (drY2>frame.rows)
{
drY2 = frame.rows;
}
Point tl2(eyes[f].x + faces[i].x, tlY2);
Point dr2(eyes[f].x + eyes[f].width + faces[i].x, drY2);

if (eyeLeftX == 0)
{

//rectangle(frame, tl2, dr2, Scalar(255, 0, 0));
eyeLeftX = eyes[f].x;
eyeLeftY = eyes[f].y;
}
else if (eyeRightX == 0)
{

////rectangle(frame, tl2, dr2, Scalar(255, 0, 0));
eyeRightX = eyes[f].x;
eyeRightY = eyes[f].y;

}

}
// if lefteye is lower than right eye swap them
if (eyeLeftX > eyeRightX){
croppedImage = cropFace(frame_gray, eyeRightX, eyeRightY, eyeLeftX, eyeLeftY, 200, 200, faces[i].x, faces[i].y, faces[i].width, faces[i].height);
}
else{
croppedImage = cropFace(frame_gray, eyeLeftX, eyeLeftY, eyeRightX, eyeRightY, 200, 200, faces[i].x, faces[i].y, faces[i].width, faces[i].height);
}

After that I rotate the face by height difference of eyes, drop it and resize it to the same size all training data is.


Mat dstImg;
Mat crop;
if (!(eyeLeftX == 0 && eyeLeftY == 0))
{

int eye_directionX = eyeRightX – eyeLeftX;
int eye_directionY = eyeRightY – eyeLeftY;
float rotation = atan2((float)eye_directionY, (float)eye_directionX) * 180 / PI;
if (rotation_def){
rotate(srcImg, rotation, dstImg);
}
else {
dstImg = srcImg;
}
}
else
{

if (noseDetection)
{
Point tl(faceX, faceY);
Point dr((faceX + faceWidth), (faceY + faceHeight));

Rect myROI(tl, dr);
Mat croppedImage_original = srcImg(myROI);

Mat noseposition_image;
resize(croppedImage_original, noseposition_image, Size(200, 200), 0, 0, INTER_CUBIC);
float rotation = gradienty(noseposition_image);
if (rotation_def){
rotate(srcImg, rotation, dstImg);
}
else {
dstImg = srcImg;
}
}
else{
dstImg = srcImg;
}

}
std::vector faces;
face_cascade.detectMultiScale(dstImg, faces, 1.1, 3, CV_HAAR_DO_CANNY_PRUNING, Size(dstImg.size().width*0.2, dstImg.size().height*0.2));

for (size_t i = 0; i < faces.size(); i++)
{

int tlY = faces[i].y;
if (tlY < 0){ tlY = 0; } int drY = faces[i].y + faces[i].height; if (drY>dstImg.rows)
{
drY = dstImg.rows;
}
Point tl(faces[i].x, tlY);
Point dr(faces[i].x + faces[i].width, drY);

Rect myROI(tl, dr);
Mat croppedImage_original = dstImg(myROI);
Mat croppedImageGray;
resize(croppedImage_original, crop, Size(width, height), 0, 0, INTER_CUBIC);
imshow(“test”, crop);
}

As you can see I use another face detection to find cropping area. It is probably not the best option and it is not configured for more than one face, but after few enhancements it is suffitient. The next part is rotation by nose. This is purely experimental and doesn’t give very good results. I had to use average of 4 frames to determine the rotation and it is quite slow.


int plotHistogram(Mat image)
{
Mat dst;

/// Establish the number of bins
int histSize = 256;

/// Set the ranges
float range[] = { 0, 256 };
const float* histRange = { range };

bool uniform = true; bool accumulate = false;

Mat b_hist, g_hist, r_hist;
/// Compute the histograms:
calcHist(&image, 1, 0, Mat(), b_hist, 1, &histSize, &histRange, uniform, accumulate);

int hist_w = 750; int hist_h = 500;
int bin_w = cvRound((double)hist_w / histSize);

Mat histImage(hist_h, hist_w, CV_8UC3, Scalar(0, 0, 0));

/// Normalize the result to [ 0, histImage.rows ]
normalize(b_hist, b_hist, 0, histImage.rows, NORM_MINMAX, -1, Mat());
int sum = 0;
int max = 0;
int now;
int current = 0;
for (int i = 1; i < histSize; i++)
{

now = cvRound(b_hist.at(i));
// ak su uhly v rozsahu 350-360 alebo 0-10 dame ich do suctu
if ((i < 5))
{
max += now;
current = i;
}

}

return max;

}
float gradienty(Mat frame)
{

Mat src, src_gray;
int scale = 1;
int delta = 0;
src_gray = frame;
Mat grad_x, grad_y;
Mat abs_grad_x, abs_grad_y;
Mat magnitudes, angles;
Mat bin;
Mat rotated;
int max = 0;
int uhol = 0;
for (int i = -50; i < 50; i++) { rotate(src_gray, ((double)i / PI), rotated); Sobel(rotated, grad_x, CV_32F, 1, 0, 9, scale, delta, BORDER_DEFAULT); Sobel(rotated, grad_y, CV_32F, 0, 1, 9, scale, delta, BORDER_DEFAULT); cartToPolar(grad_x, grad_y, magnitudes, angles); angles.convertTo(bin, CV_8U, 90 / PI); Point tl((bin.cols / 2) – 10, (bin.rows / 2) – 20); Point dr((bin.cols / 2) + 10, (bin.rows / 2)); Rect myROI(tl, dr); Mat working_pasik = bin(myROI); int current = 0; current = plotHistogram(working_pasik); if (current > max)
{
max = current;
uhol = i;
}
}
noseQueue.push_back(uhol);
int suma = 0;
for (std::list::iterator it = noseQueue.begin(); it != noseQueue.end(); it++)
{

suma = suma + *it;
}
int priemer;
priemer = (int)((double)suma / (double)noseQueue.size());
if (noseQueue.size() > 3)
{
noseQueue.pop_front();
}

return priemer;

}
Main idea behind this is to compute vertical and horizontal sobel for nose part and find the angle between them. Then I determine which angle is dominant with help of histogram and I use its peak value in finding the best rotation of face. This part can be improved by normalizing the histogram on start and then using just values from one face rotation angle to determine the angle between vertical position and current angle.

Rotation is done simply by this function


void rotate(cv::Mat& src, double angle, cv::Mat& dst)
{
int len = max(src.cols, src.rows);
cv::Point2f pt(len / 2., len / 2.);
cv::Mat r = cv::getRotationMatrix2D(pt, angle, 1.0);

cv::warpAffine(src, dst, r, cv::Size(len, len));
}

And in the code earlier I showed you how to crop the face and then resize it to default size.

Use trained model for face recognition

We now have model of faces trained and enhanced image of face we want to recognize. Tricky part here is determining when the face is new (not in training set) and when it is recognized properly. So I created some sort of treshold for distance and found out that it lies between 11000 and 12000.

int predictedLabel = -1;
double predicted_confidence = 0.0;
model->set("threshold", treshold);
model->predict(croppedImage, predictedLabel, predicted_confidence);

Display result

After we found out whether the person is new or not we show results:

if (predictedLabel > -1)
{

text = labels[predictedLabel];
putText(frame, text, tl, fontFace, fontScale, Scalar::all(255), thickness, 8);
}

Posted on

Tracking people in video with calculating the average speed of the monitored points

This example shows a new method for tracking significant points in video, representing people or moving objects. This method uses several OpenCV functions.

The process

  1. The opening video file
    VideoCapture MojeVideo („cesta k súboru");
    
  2. Retrieve the next frame (picture)
    Mat FarebnaSnimka;
    MojeVideo >> FarebnaSnimka;
    
  3. Converting color images to grayscale image
    Mat Snimka1;
    cvtColor(FarebnaSnimka, Snimka1, CV_RGB2GRAY);
    
  4. Getting significant (well observable) points
    vector<cv::Point2f> VyznacneBody;
    goodFeaturesToTrack(Snimka1, VyznacneBody, 300, 0.06, 0);
    
  5. Getting the next frame and its conversion
  6. Finding significant points from the previous frame to the next
    vector<cv::Point2f> PosunuteBody;
    vector<uchar> PlatneBody;
    calcOpticalFlowPyrLK(Snimka1, Snimka2, VyznacneBody, PosunuteBody, PlatneBody, err);
    
  7. Calculation of the velocity vector for each significant point
  8. Clustering of significant points according to their average velocity vectors
  9. Visualization
    1. Assign a color to cluster
    2. Plotting points on a slide
    3. Plotting arrows at the center points of clusters – average of the average velocity vectors
  10. Dumping the clusters and other places for the classification of points into them (to preserve the color of the cluster) + eventual creation of new clusters
  11. Landmarks declining over time – the time when they need to re-designate

Result

  • This method is faster than OpenCV method for detecting people.
  • It also works when only part of person is visible, position is unusual or person is rotated.
  • Person is divided to parts.
  • It does not distinguish between persons or other moving objects.
Posted on

Recognition of car plate

Recognition of the car and finding its plate is popular theme for school projects and there are also many commercial systems. This project shows how you can recognize cars and its plate from video record or live stream. After a little modification it can by used to improve some parking systems. Idea of this algorithm is absolute different between frames and lot of testing.

Functions used: medianBlur, cvtColor, adaptiveThreshold, dilate, findContours

Input

The process

  1. Customizing the size of video footage
  2. Convert image to gray scale and blur it
    medianBlur(mainPicture,temp1,15);
    cvtColor(temp1,temp1, CV_BGR2GRAY);
    
  3. Start making absolute different between every 4 frames
  4. Threshold picture with number of thresh is 20 and number of maxval is 255
    adaptiveThreshold(temp1, temp1, 255, ADAPTIVE_THRESH_GAUSSIAN_C, THRESH_BINARY_INV, 35, 5);
    
  5. Make 25 iterations of dilation
    dilate(output,output,Mat(),Point(-1,-1), 25,0);
    
  6. Find contures from actual picture and take the area of the biggest conture
    findContours( picture.clone(), contours, CV_RETR_LIST, CV_CHAIN_APPROX_SIMPLE);
    
  7. Now you have color picture of whole car and the next step is to find a car light. Plate is somewhere between car lights.
  8. Another conversion to gray scale, erosion, dilation and blur
  9. Now threshold picture with thresh number 220 and maxval number 255
  10. Split picture to right part and left part
  11. Find biggest conture for both sides of the picture
  12. Make rectangle with both contures in it and slightly wides

Sample

Step 2 – Grey scale and blurring
Step 5 – Dilation
Step 6 – Finding the biggest conture
Step 8 – Thresholding

Result

Recognition of the car plate

// oznacenie praveho a laveho svetla
polylines(tempCar, areaR, true,Scalar(0,255,0), 3, CV_AA);
polylines(tempCar, areaL, true,Scalar(255,0,0), 3, CV_AA);

//najdenie miesta kde by sa mala nachadzat SPZ
if(!areaL.empty() && !areaR.empty() ){
//if( contourArea(Mat(areaL)) - contourArea(Mat(areaR)) < 100  ) {
      for(int i = 0; i < areaL.size(); i++){
           areaR.push_back(areaL[i]);
      }
      Rect rectR = boundingRect(areaR);
      if(rectR.width < 285 && rectR.width > 155 && rectR.height > 4 && rectR.height < 85){
            rectR.height = rectR.height + 30;
            rectangle(tempCar, rectR, CV_RGB(255,0,0));
      }
}
Posted on

Face Verification

Description

Project deals with face recognition and verification of person. It processes set of images on wich it trains eigenface and fisher face recognizer. Source of images can be csv file or web camera. When images are loaded program tries to recognize faces from set of test images and from web camera. Confidance is computed from detection which is used to verify owner of the face.

OpenCV function used

detectMultiScale, equalizeHist, createEigenFaceRecognizer, createFisherFaceRecognizer

The process

  1. Selecting and sorting images according to people (optional)
  2. Wrintting appropriate csv file (optional)
  3. Histogram equalization
  4. Face detection
  5. Add face and its label to vectors
  6. Train recognizer on saved images
  7. Predict from csv or camera

Detection phases

  1. Preprocessing (improve contrast in order to the intensity range- better illumination handling)
  2. Filtration and keypoints detection (nose holes, lips ends), available detectors: SIFT, SURF, FAST
  3. Used 2 recognizers
    1. Eigenfaces recognizer
    2. Fisher face recognizer

Sample

  1. Input image
  2. Haar face detection
  3. Conversion to grayscale
  4. Histogram equalization
  5. Recognizer training
    => RECOGNIZER
  6. Face verification
bool calculateMetrics( cv::Mat &face, bool drawToFrame )
{
std::vector<cv::Rect> eyes;
std::vector<cv::Rect> nose;
std::vector<cv::Rect> mouth;

cv::Mat canvas = faceFrameColor.clone();

// Detect eyes
eyes_cascade.detectMultiScale ( face, eyes,  1.1, 2, 0|CV_HAAR_SCALE_IMAGE, cv::Size(30, 30) );
if ( eyes.size() >; 1 && abs(eyes[0].y - eyes[1].y) < faceSize/5 && abs(eyes[0].x - eyes[1].x) > eyes[0].width)
{
    if (eyes[0].x < eyes[1].x) {
        leftEyeRect = eyes[0];
        rightEyeRect = eyes[1];
    } else {
        leftEyeRect = eyes[1];
        rightEyeRect = eyes[0];
    }
    if ( drawToFrame ) {
       rectangle(canvas, eyes[0], cv::Scalar(128,255,255), 2 );
       rectangle(canvas, eyes[1], cv::Scalar(128,255,255), 2 );
    }
    // Detect nose
    nose_cascade.detectMultiScale ( face, nose,  1.1, 2, 0|CV_HAAR_SCALE_IMAGE, cv::Size(30, 30) );
    if ( nose.size() > 0 && nose[0].y > eyes[0].y && ARE_ORDERED( eyes[0].x, nose[0].x, eyes[1].x ) )
    {
       noseRect = nose[0];
       if ( drawToFrame ) rectangle(canvas, nose[0], cv::Scalar(255,128,128), 2, 8 );

       // Detect mouth
       mouth_cascade.detectMultiScale( face, mouth, 1.1, 2, 0|CV_HAAR_SCALE_IMAGE, cv::Size(30, 30) );
       if ( mouth.size() > 0 && mouth[0].y + mouth[0].height > nose[0].y + nose[0].height && ARE_ORDERED( eyes[0].x, mouth[0].x, eyes[1].x ))
       {
           mouthRect = mouth[0];
           if ( drawToFrame ) {
               rectangle(canvas, mouth[0], cv::Scalar(64,255,64), 2, 4 );
               cv::imshow( "Face parts", canvas );
               cv::waitKey(33);
           }
       return true;
       }
    }
}
    return false;
}