Martin Tamajka
In this project, our goal was to apply image segmentation techniques to dense volume of standard medical data.
Oversegmentation
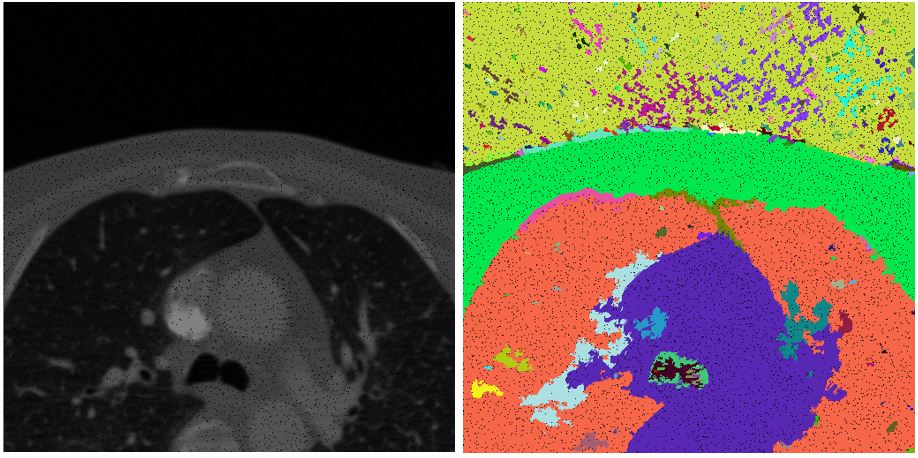
Our method is based on oversegmentation to supervoxels (similar to superpixels, but in 3D volume). Such oversegmentation dramatically decreases processing time and has many other advantages over working directly with voxels. Oversegmentation is done using SLIC algorithm (http://www.kev-smith.com/papers/SLIC_Superpixels.pdf). Implementation that we use was created by authors and does not depend on any other library. This comes at cost of necessity to transform images in OpenCV format to C++ arrays. SLIC allows to choose between supervoxel compactness (or regularity of shape) and intensity homogeneity. In our work, we decided to prefer homogeneity over regularity, because different tissues in anatomical organs have their typical intensities.
Merging supervoxels
After we oversegmented images, we created object representation of volume. Our object representation (SLIC3D) has following attributes:
[c language="c++"]
vector<Supervoxel*> m_supervoxels;
std::unordered_map<int, Supervoxel*> m_supervoxelsMap;
int m_height;
int m_width;
int m_depth;
[/c]The most important is the vector of Supervoxel pointers. Supervoxel is our basic class providing important information about contained voxels, can generate features that can be used in classification process and (very important) knows its neighbouring supervoxels. Currently, Supervoxel can generate 3 kinds of features:
[c language="c++"]
float Supervoxel::AverageIntensity()
{
return m_centroid->intensity;
}float Supervoxel::AverageQuantileIntensity(float quantile)
{
assert(quantile >= 0 && quantile <= 1);float intens = 0;
int terminationIndex = quantile * m_points.size();
for (int i = 0; i < terminationIndex; i++)
intens += m_points[i]->intensity;return intens / terminationIndex;
}float Supervoxel::MedianIntensity()
{
return m_points[m_points.size() / 2]->intensity;
}
[/c]SLIC3D class (the one containing supervoxels) has method where “all magic happens†- MergeSimilarSupervoxels. As stated in its name, method merges voxels. Method performs given number of iterations. In each iteration, method takes random supervoxels, compares it with its neighbours and if a neighbour and examined supervoxels have similar average intensity, the latter one is merged to the examined one. Code can be seen right below.
[c language="c++"]
bool SLIC3D::MergeSimilarSupervoxels()
{
vector<Supervoxel*> supervoxelsToBeErased;
for (int i = 0; i < 10000; i++)
{
cout << i << " " << m_supervoxels.size() << endl;
std::sort(m_supervoxels.begin(), m_supervoxels.end(), helper_sortFunctionByAvgIntensity);Supervoxel* brightestSupervoxel = m_supervoxels[rand() % (m_supervoxels.size() - 1)];
std::unordered_map<int, Supervoxel*> nb = *(brightestSupervoxel->GetNeighbours());int numberOfIterations = 0;
vector<int> labelsToBeErased;
for (auto it = nb.begin(); it != nb.end(); it++)
{
if (std::min(brightestSupervoxel->AverageIntensity(), it->second->AverageIntensity()) / std::max(brightestSupervoxel->AverageIntensity(), it->second->AverageIntensity()) > 0.95)
{
helper_mergeSupervoxels(brightestSupervoxel, it->second);
labelsToBeErased.push_back(it->second->GetLabel());
supervoxelsToBeErased.push_back(it->second);
}
else
{
//cout << "nope" << endl;
}
numberOfIterations++;
}for (int i = 0; i < labelsToBeErased.size(); i++)
{
Supervoxel* toBeRemoved = m_supervoxelsMap[labelsToBeErased[i]];if (NULL == toBeRemoved)
continue;std::unordered_map<int, Supervoxel*> nbb = *(toBeRemoved->GetNeighbours());
for (auto it = nbb.begin(); it != nbb.end(); it++)
{
try
{
it->second->AddNeighbour(brightestSupervoxel);
it->second->RemoveNeighbour(toBeRemoved);
brightestSupervoxel->AddNeighbour(it->second);
}
catch (Exception e)
{
cout << "exc: " << e.msg << endl;
}
}
}for (int i = 0; i < labelsToBeErased.size(); i++)
{
Supervoxel* toBeRemoved = m_supervoxelsMap[labelsToBeErased[i]];
m_supervoxelsMap.erase(labelsToBeErased[i]);
//delete toBeRemoved; //COMMENT
}brightestSupervoxel->RecalculateCentroid();
m_supervoxels.clear();
for (auto it = m_supervoxelsMap.begin(); it != m_supervoxelsMap.end(); ++it)
{
m_supervoxels.push_back(it->second);
}
}for (int i = 0; i < supervoxelsToBeErased.size(); i++)
;// delete supervoxelsToBeErased[i]; //COMMENT - to be considered if deletereturn true;
}
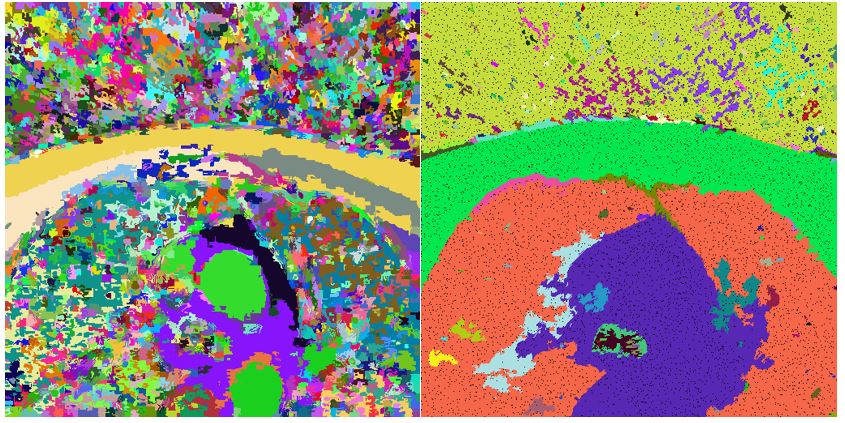
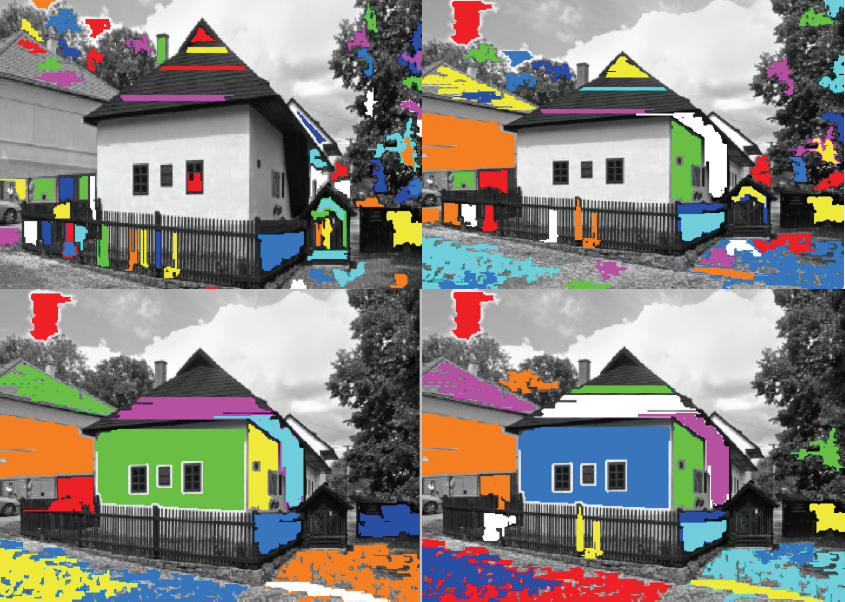
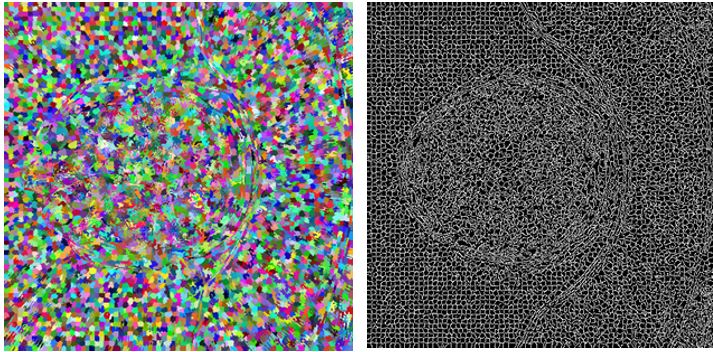
[/c]Results of merging in such form highly depend on chosen similarity level. In the picture below left we can see result of applying similarity level 0.95. In the image right the value of similarity level was chosen to be 0.65.
We also tried to train SVM to classify brain and non-brain structures using just these features. We got 4 successful classifications of 5. With classification we will continue later.